Macターミナル上でスマホアプリのHttpリクエストをとりあえず確認する
Mac標準にインストールされているApacheでProxyを立てて、スマホのネットワーク設定でProxyを経由するようにする。
Apache側の設定
$ sudo vim /private/etc/apache2/other/sample-proxy.conf
<IfModule mod_proxy.c>
    ProxyRequests On
    ProxyVia On
    <Proxy *>
        Order deny,allow
        Deny from all
        Allow from "LANネットワーク上のスマホのIP・マスク。allでも動くが…:例:10.0.1"
    </Proxy>
</IfModule>
:wq

$ sudo apachectl restart
MacのIPアドレス確認
$ ifconfig | grep inet
inet 192.********** ← inetの、localhostでない部分がMac自体のIPアドレス。
スマホの設定
iOS・Android(実機)
設定→Wi-Fi→で接続中のネットワークを選択する。 下にスクロールしてHTTPプロキシを「手動」選択。 サーバは上記で調べたIPアドレスを記入。 ポートは80。 認証は今回設定していないので無視。 設定したらWi-Fi再起動。
iOS(エミュレータ)
Mac側の設定から、「Network」を開き、Advancedボタンを押し、「Proxies」まで行く。
「Select a protocol to configure」から「Web Proxy」を選択し、
localhost:80
と入力。
入力したらApplyしてエミュレータ再起動。
Log見る
$ tail -f /var/log/apache2/access_log | grep なにか
使い終わったらStopはちゃんとしましょう。
Facebook SDKのTokenから、現在許可されているパーミッションを確認する
Tokenにパーミッション情報などが含まれるので、Facebook側で用意しているDebuggerで確認することができる。
https://developers.facebook.com/tools/debug/accesstoken
APIの挙動や、試験的にパーミッション等を付与しどういった情報を取得できるかを気軽に試すには、Explorerを使用すると便利。ここからToken自体も発行可能。
https://developers.facebook.com/tools/explorer
ちなみにパーミッションに関しては以下。
PyCharm Community EditionでGoogle App Engineアプリ作成したい
本当はライセンス購入したいが、何分お金がないので…スマソ
PyCharmでPure Python Projectとして開発していると、appengine系のパッケージが参照されないので結構つらい。そこで、virtualenvwrapperを使って、参照させるようにする。
環境
- Ubuntu 14.04
- PyCharmはインストールされている
pipのインストール
aptからpipを入れるといろいろとトラブるのでeasy_installから。
$ sudo easy_install pip
gcloudコマンドのインストール
リファレンス参照。 cloud.google.com
appengine for pythonのインストール
プロジェクト作成時に出るが、一応。
$ gcloud components update gae-python
virtualenvwrapperのインストール
$ sudo pip install virtualenvwrapper
$ echo '# path to virtualenvwrapper
if [ -f /usr/local/bin/virtualenvwrapper.sh ]; then
    export WORKON_HOME=$HOME/.virtualenvs
    source /usr/local/bin/virtualenvwrapper.sh
fi
' >> ~/.bashrc
google-app-engine環境の作成
# google-app-engine環境の作成
$ mkvirtualenv google-app-engine

# google-app-engine環境に切り替わったからPath通す
(google-app-engine) $ add2virtualenv ~/google-cloud-sdk/platform/google_appengine

# deactivateでgoogle-app-engine環境から抜け出す
(google-app-engine) $ deactivate

# workonでgoogle-app-engine環境を起動できる
$ workon google-app-engine
PyCharmプロジェクトに反映
mkvirtualenvしたらPyCharm再起動。 すでにプロジェクトを作成している場合は、Settingsからproject interpreterで検索し、出てきたGoogle-app-engineに変更してApply。 新規プロジェクトの場合は、Google-app-engineのInterpreterを選択して作成。
あとはPyCharmまかせでOK。プロジェクト内で必要なライブラリ等はrequirements.txtに書いておけば、PyCharm側からインストールできる。
Androidのadbコマンドからアプリを起動する
Android Studioのログを見ていればわかるが、一応メモ。
$ adb shell am -n start com.package.name/com.package.name.ActivityName
Androidのadbコマンドからタップイベントを起こす
エミュレータ・実機関係なく操作可能。
# adb shell input tap x y
$ adb shell input tap 150 300
他の動作(文字列入力など)は、下記方法で調べられる。
$ adb shell
shell@android:/ $ input
GitのSubmoduleを最新に同期する
$ git submodule foreach git pull origin master
TextViewのAutoLinkのURL起動先を、デフォルトブラウザでなく独自のActivityにする
基本的にはLinkMovementMethodの一部ソースをコピったあと、ブラウザに飛ばすであろう箇所のコードを削除し、自分でIntentを書けばOK。あまりいい解決法とも思えないが・・・
MainActivity.java
.
.
.
    @Override
    public void onCreate(Bundle savedInstanceState) {
        super.onCreate(savedInstanceState);
        setContentView(R.layout.activity_main);
        TextView tv = (TextView) findViewById(R.id.text_view);
        tv.setMovementMethod(MyLinkMovementMethod.getInstance());
    }
.
.
.
activity_main.xml
<RelativeLayout xmlns:android="http://schemas.android.com/apk/res/android"
    android:layout_width="match_parent"
    android:layout_height="match_parent"
    <TextView
        android:id="@+id/text_view"
        android:autoLink="web"
        android:text="hello, www.google.com world."
        android:textColorLink="@android:color/holo_red_dark"
        android:textColorHighlight="@android:color/holo_red_light"
        android:layout_width="wrap_content"
        android:layout_height="wrap_content" />
</RelativeLayout>
MyLinkMovementMethod.java
package com.tatuas.textview.link.sample;

import android.content.Context;
import android.content.Intent;
import android.text.Layout;
import android.text.Selection;
import android.text.Spannable;
import android.text.method.LinkMovementMethod;
import android.text.style.ClickableSpan;
import android.text.style.URLSpan;
import android.view.MotionEvent;
import android.widget.TextView;

import com.tatuas.textview.link.sample.MyBrowserActivity;

public class MyLinkMovementMethod extends LinkMovementMethod {
    private static MyLinkMovementMethod sInstance;

    public static MyLinkMovementMethod getInstance() {
        if (sInstance == null) {
            sInstance = new MyLinkMovementMethod();
        }
        return sInstance;
    }

    @Override
    public boolean onTouchEvent(TextView widget, Spannable buffer, MotionEvent event) {
        int action = event.getAction();

        if (action == MotionEvent.ACTION_UP ||
                action == MotionEvent.ACTION_DOWN) {
            int x = (int) event.getX();
            int y = (int) event.getY();

            x -= widget.getTotalPaddingLeft();
            y -= widget.getTotalPaddingTop();

            x += widget.getScrollX();
            y += widget.getScrollY();

            Layout layout = widget.getLayout();
            int line = layout.getLineForVertical(y);
            int off = layout.getOffsetForHorizontal(line, x);

            ClickableSpan[] link = buffer.getSpans(off, off, ClickableSpan.class);

            if (link.length != 0) {
                if (action == MotionEvent.ACTION_UP) {
                    /*
                     * Delete this code
                     */
                    //link[0].onClick(widget);

                    /*
                     * Write your custom logic
                     */
                    if (link[0] instanceof URLSpan) {
                        String url = ((URLSpan) link[0]).getURL();
                        Context context = widget.getContext();
                        Intent intent = new Intent(context, MyBrowserActivity.class);
                        intent.putExtra("bundle_key_link_url", url);
                        context.startActivity(intent);
                    }
                } else if (action == MotionEvent.ACTION_DOWN) {
                    Selection.setSelection(buffer,
                            buffer.getSpanStart(link[0]),
                            buffer.getSpanEnd(link[0]));
                }

                return true;
            } else {
                Selection.removeSelection(buffer);
            }
        }

        return super.onTouchEvent(widget, buffer, event);
    }
}
なお、TextViewのオプションで、textColorLinkでリンクそのものの色を、textColorHighLightでリンクを押した時の色を、それぞれ変えられる。
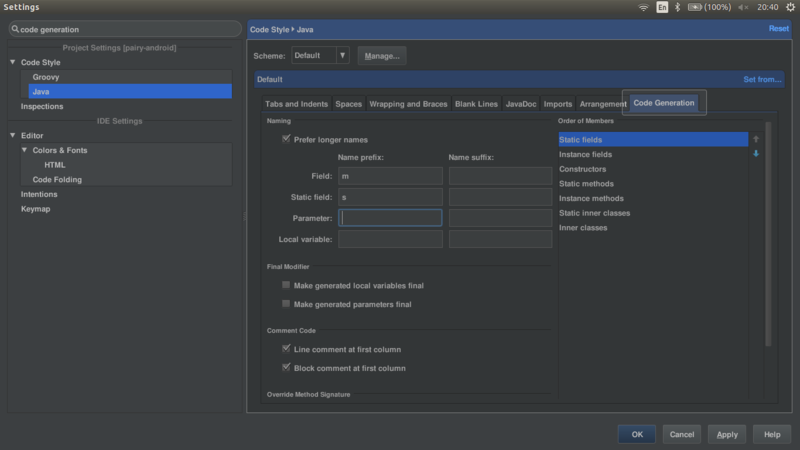
Android StudioのGetter Setter生成機能の際PrefixやSuffixを取り除く

Setting -> Code Style -> Java -> Code Generation -> Name suffix
にmを入れる。
AndroidのCompat版ToolBarにActionBarとして使いつつアイコンを表示したい
@Override
public void onCreate(Bundle bundle) {
    super.onCreate(bundle);
    setContentView(R.layout.main_activity);

    Toolbar toolbar = (Toolbar) findViewById(R.id.toolbar);
    setSupportActionBar(toolbar);

    toolbar.setNavigationIcon(R.drawable.ic_launcher);
}
setSupportActionBarを呼び出したあとにSetterを呼ばないとうまく設定されない。
これはバグな気がするが・・・。
Webサービスを退会する
Webサービスの中には、なかなか退会できないものがある。
そうした場合に、簡単に退会方法を探す方法があった。
Just Delete Me | A directory of direct links to delete your account from web services.
Search欄に該当のサービス名を入力すればOK。
ToolBarにStyleを設定する
<style name="MyToolbarStyle" parent="Widget.AppCompat.Toolbar">
    <item name="android:background">@android:color/black</item>
    <item name="popupTheme">@style/ThemeOverlay.AppCompat.Light</item>
    <item name="theme">@style/ThemeOverlay.AppCompat.Dark.ActionBar</item>
</style>
あとはToolBarの属性内に適応する。
<android.support.v7.widget.Toolbar
    android:id="@+id/my_toolbar"
    android:layout_height="wrap_content"
    android:layout_width="match_parent"
    android:minHeight="?attr/actionBarSize"
    style="@style/MyToolbarStyle" />
KitKatから採用された透明ステータスバーとナビゲーションバー
<style name="AppTheme" parent="Theme.AppCompat.Light">
    <item name="android:windowTranslucentNavigation">true</item>
    <item name="android:windowTranslucentStatus">true</item>
</style>
ナビゲーションバーは戻るボタンの部分。
ステータスバーは上の通知部分。
ステータスバーを透明にすると、ステータスバー分のスペースもなくなるので、XMLで別途作成する。
どちらかをtrueにすると、フルスクリーンでレンダリングされる。
values-v19のディレクトリを作ること。
KitKatだときれいなグラデーションになるが、Lollipopだとただの半透明になるのは若干気になる。